2.5.4-application-settings
2.5.4 Application Settings
Click the lower right corner of an individual app to display its settings. The operations available in draft mode are shown in the image below.
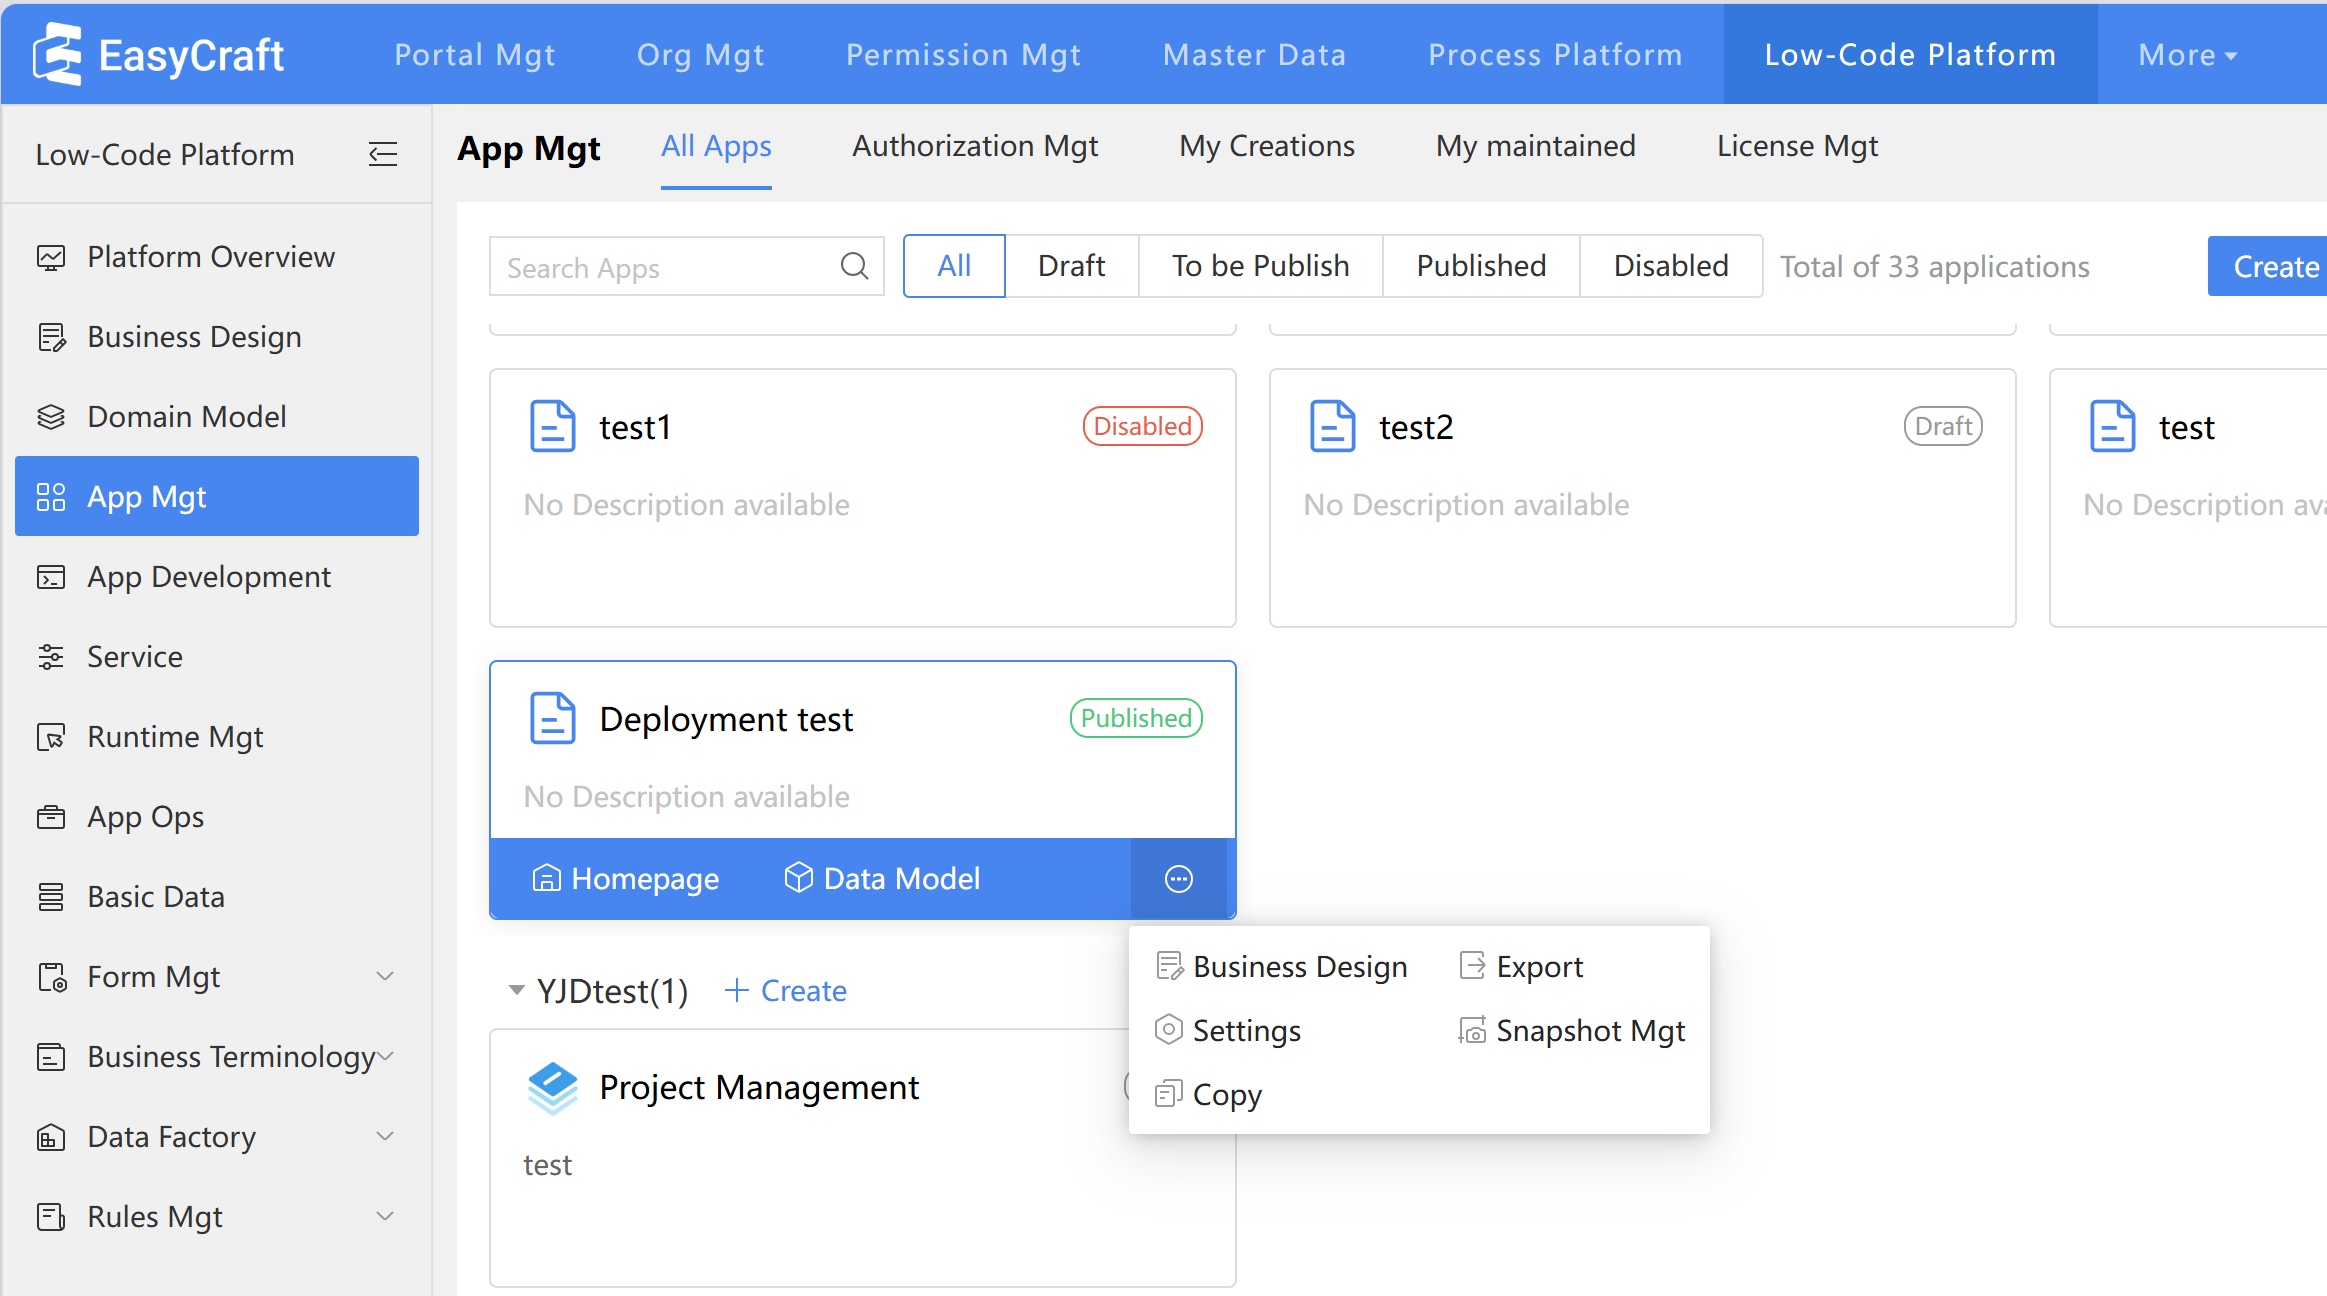
Figure: Application Settings
The usage methods for various app settings are as follows:
- Homepage: After completing the app design, click on the homepage to view the app's front end.
- Settings: Configure the application's settings and permissions, including modifying the app's name and determining who can use or maintain it.
- Export: Export the application's design content, which includes all form designs (forms, processs, lists, actions, triggers, and other design elements), as well as the content for both the PC and mobile homepages. This content can be reused through the import function.
- Delete apps: This action can only be performed when the application is in "Draft" status. Deleting the application will also remove its associated business data.
- Activate: This button only appears for shared apps. Users can copy and paste the authorization code into the input box to activate the app.
- Convert to private: This button is visible only for shared apps with full authorization. Clicking it will change the app from shared to private. If the system is using a runtime license, it will check the remaining number of licenses. If no licenses are left, the app cannot be converted to private.
- Snapshot Mgt: Applications support generating, restoring, and deleting snapshots.
- Copy: Users can copy the app's design content, which includes all form designs (forms, processs, lists, actions, action flows, triggers, etc.), along with the PC and mobile homepages. This can be done using the application copy feature n.
- Data model: Provides quick access to the current application's data model editing page, allowing users to view and edit the application's data model.
- Business Design: Supports linking DingTalk documents and business design documents.
2.5.4.1 Snapshot Mgt
After building an application, users may need to make significant modifications. Before doing so, it's wise to create a backup of the current application. If users need to revert to the version prior to the modifications, users can restore it from a snapshot.
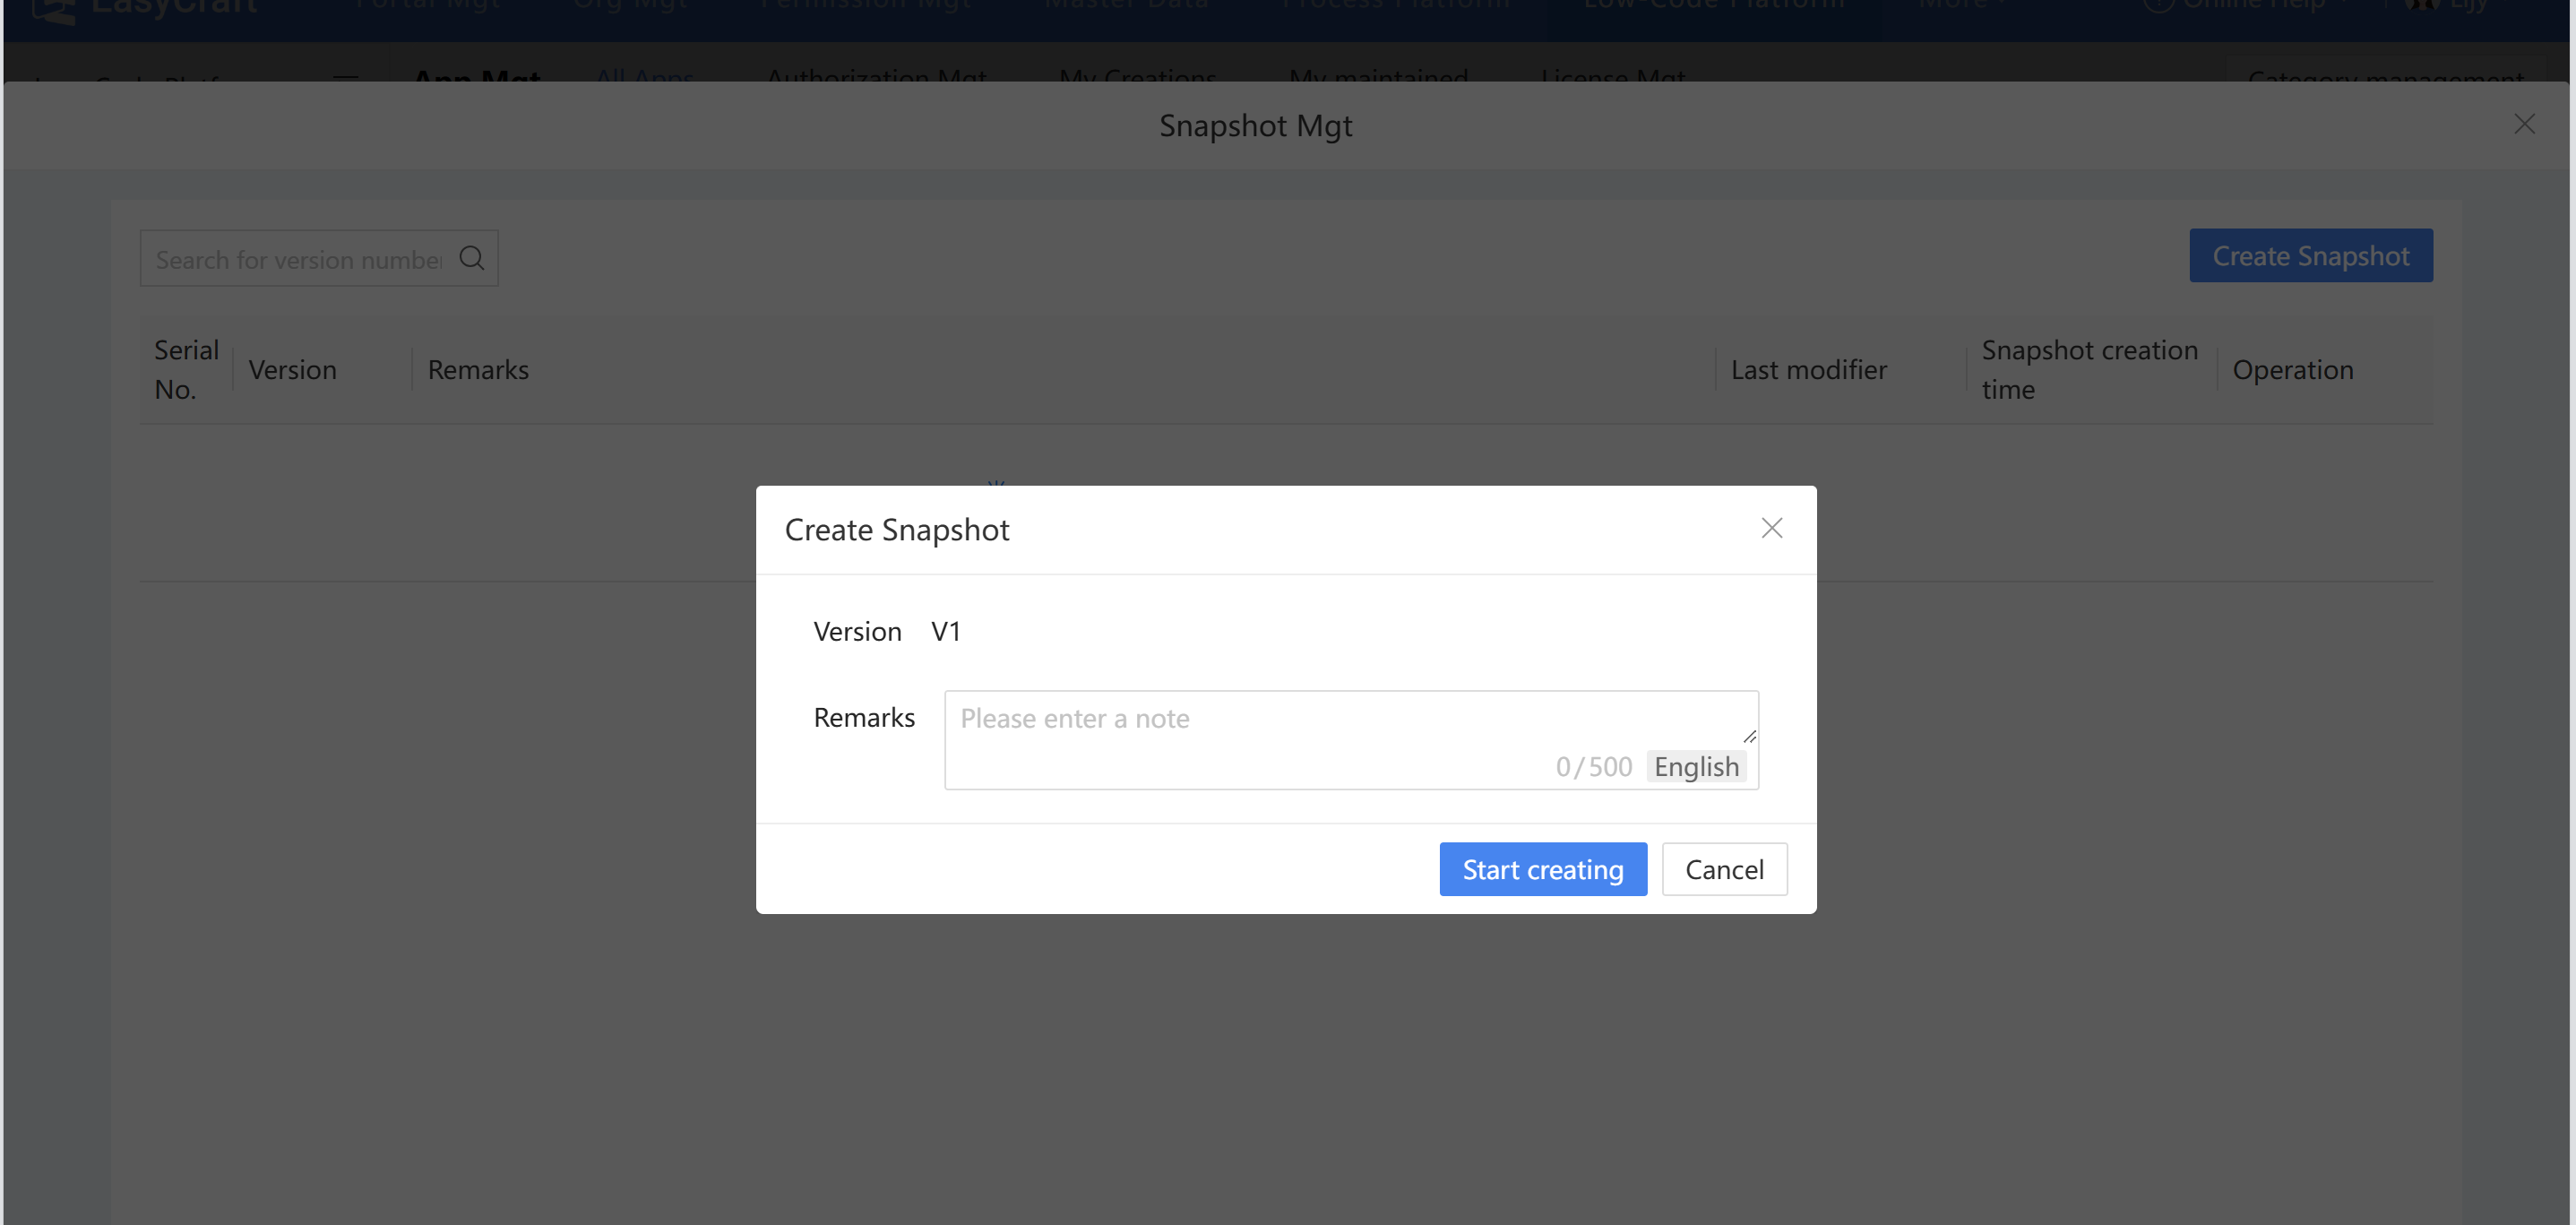
Figure: Snapshot Management
Scenario: In an employee activity application, if users want to add a list of intended invitees, users should first create a snapshot of the original application. If the list is later deemed unnecessary, users can simply restore the application to its prior state.
- Create Snapshot
If the application does not currently have an invitation form, clicking "Snapshot Mgt" will open a pop-up. Selecting "Create Snapshot" generates a snapshot version of the current application. Once created, the version information will display in the list, starting from V1.
Note: When creating a snapshot, check if the form, processs, and action flow have been published. If any are unpublished, prompt the user. They can click to navigate to the corresponding design page, publish first, and then recheck. A snapshot can only be created when all configurations are published.
- Restore Snapshot
If the application has a newly created intended invitees form and a snapshot V2 version is created, clicking "Restore" will revert to V1 (without the intended invitees form).
When restoring a snapshot, be aware that certain operations may occur, such as deleting forms and data list views if they transition from existing to non-existent. The same rule applies to other configurations.
After a successful restoration, the corresponding entry data will be removed from view. Once users have restored to V1, check the configuration data. The invitee form will no longer be present in the interface. If users require this form again, users can restore snapshot V2.
- Delete Snapshot
Deleting a snapshot removes the unnecessary snapshot version data from the list. After deletion, it will no longer appear in the list.
2.5.4.2 Copy
To replicate an App click "Copy" in lower right corner of an individual app, then follow system prompts to configure settings.
a. After clicking "Copy," a pop-up box will appear to select associated applications. If an application has existing associations with other applications, users can choose to select or deselect the checkboxes for copying those applications. If the boxes are unchecked, the copied application will maintain its association with the original applications. If checked, the copied application will establish new associations with the applications that were copied.
b. Click "Next" to go to the application copy code entry page. Users can manually input a new application code, or use the form code's random generation feature. The new form code will follow the naming convention of the application code prefix combined with a randomly generated string.
c. The application replication interface will display a progress bar. Once the replication is successful, the cursor will automatically focus on the replicated application and the display rule for the copied application name is an underlined copy of the original application name. The data in the replicated application forms will not be duplicated; however, other configuration items, role permissions, action flows, form designs, process designs, and mechanism deployments will all be replicated.